


Loading egg incubators for optimal heat balance (Part 3)
This series of 3 articles shows you the best possible ways to mix eggs from different flocks in the incubator. 29 November 2018
 6 minute read
So far, you learned about embryonic heat production and heat exchange in incubated eggs and how you should load them in the setter according to their “living mass”. Now the last thing left for you to discover is how you correctly transfer mixed eggs to the hatchers. Let me explain.
By Eduardo Romanini, Hatchery Development Specialist, Petersime
Part 3: Transfer pattern and loading of hatchers
You’ve heard the advice a million times: loading the setter in a thermal balanced way is essential for an optimal embryonic development and their hatching time. But did you realise you can easily ruin your efforts during transfer or in the hatcher?
For a long time, the last three days of incubation in the hatchers were only seen as a finishing phase with limited importance. Like a ‘final make-up’ for chick quality. Compared to the first 18 days in the setters, hatchers got much less attention in the past. Luckily, this has changed significantly over the last years.
By contrast, it is now clear that all good work done in the setters in terms of balanced loading eggs from different flocks can be completely damaged in the hatchers. The truth is: only the combination of good operational practices in both setters and hatchers results in optimal hatchability and day-old chick quality.
Uniformity is key
Like in setter machines, considering potential differences in heat production for mixed incubated eggs is key to define the transfer and loading patterns for hatchers. During the hatching process, embryos go through the most critical biological transitions (internal pipping, external pipping and shell emergence) that demand very specific environmental conditions.
Basically, correct embryo/chick thermal comfort in the hatchers can only be effective with uniform eggs. This emphasizes that ideally only fertile eggs from one single flock, same storage period, and from symmetrical trolley positions in the setters should fill one hatcher. Combining eggs with different characteristics in one hatcher makes it difficult or even impossible to achieve optimal hatching conditions.
The fact that hatchers are usually smaller in size compared to setters (normally with capacity for 4 or 8 trolleys) makes it easier to fill them with uniform eggs. This makes the hatcher a special environment that allows proper fine-tune on airflow and incubation profiles for a specific batch of eggs. Usually, the hatcher profiles consist of standard air temperature, ventilation rate, CO2 and humidity levels in function of the heat production of the eggs.
Transfer from setter to hatcher
Correctly loading the hatchers starts where it ends for the setters: at transfer. You already know that trolleys must be strategically combined and positioned considering their heat production in the setter. Because one single hatcher ideally should be loaded with uniform eggs, they all should come from the same specific positions in the balanced loaded setter. Let’s see how you best put this into practice taking the example of transferring one setter of 12 trolleys to 3 hatchers of 4 trolleys capacity each.
- Hatcher 1: All eggs with medium heat production (positioned near the wall)
- Hatcher 2: All eggs with low heat production (positioned in the center)
- Hatcher 3: All eggs with high heat production (positioned near the central mixing fan)
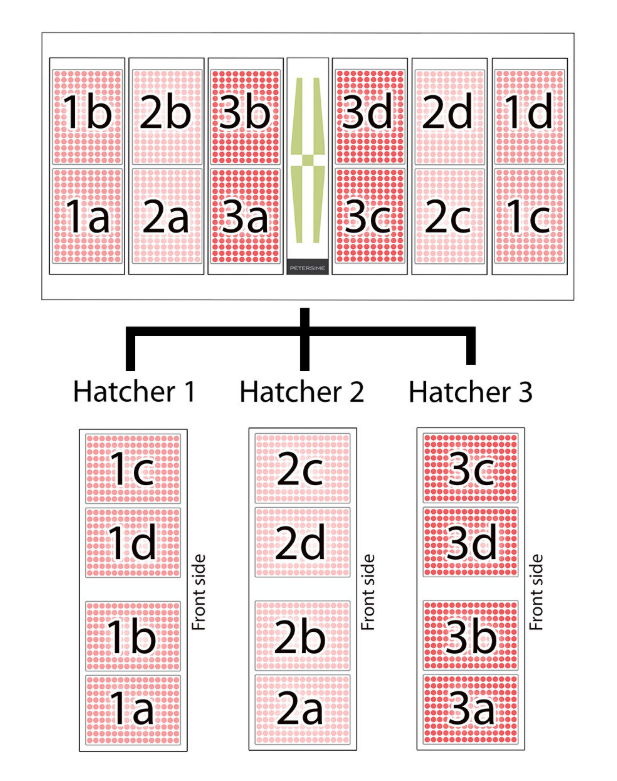
Example: transfer pattern for 1 setter of 12 trolleys capacity to 3 hatchers of 4 trolleys capacity each
The same principle applies for configurations of setters and hatchers with other capacities. By loading the hatchers with eggs as uniform as possible, each hatcher can use a different incubation profile according to the heat production of the eggs in it. There will be no mixed eggs in the same machines (or minimal differences), so the temperature can be adjusted according to the embryo needs. Besides, the thermal comfort for the recent hatched chicks can be guaranteed.
For instance, because eggs transferred to hatcher 2 are the ones with lowest potential to generate heat, it makes sense that the temperature profile of this hatcher is slightly higher compared to hatchers 1 and 3. Similarly, CO2 programmed levels on hatcher 2 can be slightly reduced because of lower heat production and still keep a good ventilation rate and provision of O2.
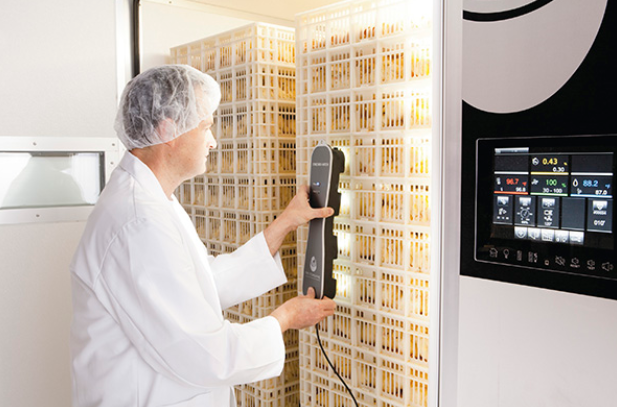
Control of the hatcher conditions
With the advanced incubation technology, hatchers are nowadays recognised as an important tool to improve the hatch results. Thanks to new sensors and controlling strategies, there are many possibilities in terms of adjusting the machine conditions to the specific requirements of the embryo during the hatching process. For instance: Synchro-Hatch™ technologies mimic the interaction between the mother hen and eggs in a natural incubation condition (click to read how the Synchro-Hatch™ works).
Synchro-Hatch™ mimics the interaction between the mother hen and eggs in a natural incubation condition
As any other tool, hatchers need to be fully understood and used in a correct way to achieve optimal hatchability and chick quality. A correct transfer pattern and loading of eggs into hatchers is an important prerequisite.
Conclusion
The bottom line of this article series is: if you make sure you create uniform batches of eggs, put them in the right position in the setters and then transfer them to the correct hatcher, this should significantly improve your results.
Now it’s up to you to make it happen in your hatchery. Or do you prefer to learn more about it first? Contact us via [email protected] and join a Hatchery Management training to improve your performance. This training includes a detailed session about balanced loading of different machines.