

Bobwhite Quail Production 2
Advice on the production of bobwhite quail from Professor Peter A. Skewes of Clemson University and Professor Emeritus Henry R. Wilson of the University of Florida; Florida Cooperative Extension Service. This article offers general advice and information on egg care, incubation, brooding, grow-out and flight conditioning.Egg Care and Incubation
Egg Care
The eggs your breeders produce represent the final product of all the time, money and effort you have invested. Treat each egg as if it is the only one you have. The embryos within the egg are extremely sensitive to temperature, humidity and position. Remember, nothing you do can improve a hatching egg once it is laid. You can only try to preserve its quality after it is laid.
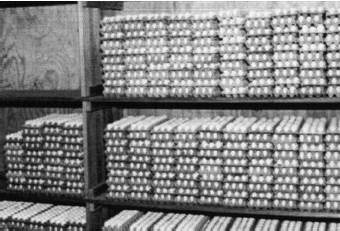
The eggs should be collected a minimum of three times per day to limit their exposure to conditions in the breeder house. The last pickup should be late in the day so that the eggs do not remain in the breeder house overnight. Discard all dirty eggs. Attempting to wash or scrub the eggs will remove the outer protective coating of the egg and allow increased contamination and water loss. The problem of soiled eggs should be resolved by improving management and sanitation in the breeder house. Eggs need to be stored with the small end down in a cooler with a temperature of 55°F to 65°F and a relative humidity of 75 to 90 per cent (Figure 1).
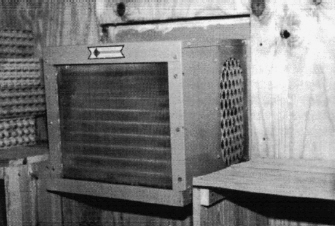
A standard room air conditioner should not be used to cool the eggs. Air conditioners remove moisture from the air, which will dehydrate the eggs during storage. Commercial egg coolers that will maintain the proper temperature and humidity in the egg storage area are required (Figure 2).
Storing hatching eggs up to 15 days under ideal conditions will not severely reduce their hatchability. The eggs do not need to be turned during this time. Avoid moving eggs directly from the cooler to the incubator. Allowing them to sit at room temperature for one to two hours will allow a gradual temperature change that will reduce condensation on the eggs.
Egg Incubation
Determine the size and type of incubator needed for future business plans. Game bird equipment suppliers can assist with information about various makes and models of incubators
Quail eggs require about 24 days of incubation to hatch, and it is critical that incubator conditions be closely monitored during the incubation process. If the incubator is placed in a room with a constant environment between 65°F to 80°F, it will be easier to control the incubator environment. It is generally best to follow the incubator manufacturer's recommendations; however, it may be necessary to vary from these recommendations for optimal results.
If the incubator contains trays, keep all trays, with or without eggs, in the machine at all times during operation to maintain proper air flow and more uniform temperature and humidity.
Both temperature and humidity need to be adjusted to a different setting after 20 days of incubation; therefore, a separate 'hatcher' incubator should be used for the last three days of incubation (Figure 3). This eliminates the need for changing the adjustments of the 'setter' incubator.
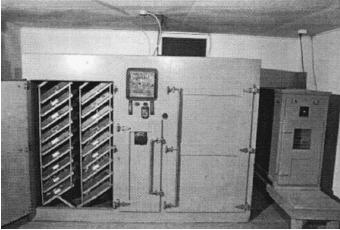
For successful incubation, several factors must be closely controlled. The most important of these are temperature, humidity, ventilation, turning, egg position and sanitation. Temperature is by far the most critical. A temperature-monitoring system with an alarm that warns of abnormal conditions is of great value, since a temperature of 1°F to 2°F above or below optimum will cause a reduced hatch and poorer quality chicks.
The temperature in a forced-air incubator should be 100.25±0.25°F (but may vary with type of incubator) until the last three days before hatching begins. On day 21, the temperature should be decreased 1.0°F. Although hatchability will be lower in a still-air incubator (no air circulating fan), many people use incubators of this type for hatching small numbers of quail. Temperatures for still-air incubators are 103°F for the first 20 days and 100°F for the last three days. The temperature should be measured at half an inch above the eggs.
Humidity is also important and is usually measured as wet-bulb temperature. It should be 86°F to 88°F until the eggs are transferred to the hatcher, at which time it is increased to 90°F to 92°F. Low humidity can result in late stage embryos that stick to the shell or die in the shell, as well as chicks that are smaller and weaker. High humidity can result in late stage embryos that die without pipping, navels that heal poorly, sticky chicks and large, sluggish chicks.
Adequate ventilation of the incubator room and incubators must be provided in order to furnish the proper amount of oxygen and to prevent a buildup of carbon dioxide. Ventilation requirements increase as embryo age increases. Recommendations of the incubator manufacturer should be followed closely.
Eggs should always be set with the small end down. During the first 20 days of incubation, the eggs should be turned a minimum of 3 times each day, but preferably 12 to 24 times per day. The eggs should be turned by rotating the trays from side to side at a 45-degree angle. Setting the eggs with the small end up or turning the eggs improperly causes dead embryos at various ages (especially during the last week) and malpositions (especially having the head in the small end of the egg).
The following is a summary of incubation conditions:
- period of incubation: 23 to 24 days
- incubator temperature, days 0 to 20: 100.25°F
- hatcher temperature, day 21 to hatch: 99.25°F
- humidity, wet bulb temperature, days 0 to 20: 86 to 88°F
- humidity, wet bulb temperature, days 21 to hatch: 90 to 92°F
- turning: three to 24 times per day
- egg position: small end down.
The incubator room, egg storage room and surrounding area should be kept clean. Washing and disinfecting these areas periodically will prevent the accumulation of dust and waste materials and the accompanying buildup of molds and bacteria. Keep all used boxes, egg flats, birds and other possible sources of contamination out of the hatchery.
Incubators, hatchers and trays must be thoroughly cleaned and disinfected after each hatch. Dirty incubators result in poor hatchability and poor chick quality. Dispose of hatchery waste materials immediately.
Fumigation with formaldehyde gas is an effective method of killing microorganisms in incubators and on eggs. Empty incubators (with trays) running at normal conditions should be fumigated for three hours with 0.6g potassium permanganate in 1.2ml of formalin (40 per cent formaldehyde) per cubic foot of incubator space.
As soon as normal running conditions are reached after the eggs are set, fumigate for 20 minutes with 0.4g potassium permanganate and 0.8ml of formalin per cubic foot of space. Do not fumigate eggs that have been set from 24 to 96 hours or when chicks are hatching. Precautions must be taken to prevent skin contact with formalin solution or the breathing of formaldehyde gas. It is important to have a good system of exhausting the gas from the room after fumigation.
An incubation timetable is listed below.
Incubation timetable
- Clean and disinfect the incubator, hatcher and egg trays.
- Two days before setting the eggs, start the incubator, allow it to reach operating conditions, and fumigate* it. Allow temperature and humidity to stabilise, then make any necessary adjustments.
- Remove the eggs from the cooler and allow them to warm to room temperature. Discard any eggs that are dirty, cracked, misshapen or of extreme size.
- Set the eggs in the incubator trays (small end down), allow incubator to reach operating conditions and fumigate* again.
- Turn the eggs up to 24 times per day.
- Monitor and record the incubator conditions frequently.
- On day 21, either change the temperature and humidity in the incubator or move the eggs to the hatcher. Stop turning the eggs. The hatching trays should have a small mesh screen or rough paper in the bottom to keep the chicks from getting spraddled legs after they hatch.
- Leave the chicks in the hatcher until they are completely dry
- Remove the chicks and place them in clean chick boxes that have rough paper liners.
* Note: Fumigation is not necessary with a small incubator.
You can expect 70 to 85 per cent of all eggs set to hatch. There are, however, many factors other than incubation conditions that will cause hatchability to fall below this level.
Possible causes of poor hatchability
Breeder problems
- use of breeders that are too old.
- use of damaged (crippled, deformed or diseased) breeders
- having an excess number of females to males
- inbreeding for more than three years
- improper lighting of breeders
- allowing temperature extremes in the breeder house
- use of old or poor quality feed.
Storage problems
- leaving eggs in breeder house too long
- storing eggs in dirty conditions or at incorrect temperature or humidity
- storing eggs too long.
Incubation problems
- rapid temperature change between cooler and incubator
- improper or badly fluctuating temperature and humidity
- incubator room temperature too high.
- improper turning of the eggs
- poor sanitation.
Brooding
Brooding involves providing warmth, high quality feed, clean water and protection during the first six weeks of a quail chick's life. Proper management during this period can eliminate some of the health problems that occur later on. Current and future plans, as well as the availability and cost of fuel, will enter into a decision about which type of brooding system to use.
The brooder building should be built so that it can be closed in cold weather and opened for ample ventilation in hot weather. It should also be rodent-proof, with the floor and lower three feet of the walls having no cracks or holes of more than 5/16-inch wide. Brooding can be carried out in floor pens with either litter or raised wire floors. Floor pens with litter are the most common and least expensive. Wire-floored pens eliminate many disease problems but require a tighter house to eliminate draughts, and the birds are more prone to cannibalism (Figure 4).
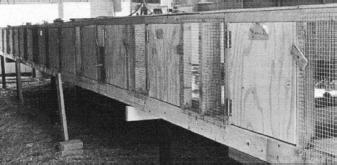
Battery brooders will hold more birds per square foot of floor space but difficult manure management and high cost have limited their use.
Heat for brooding can be provided by gas or electric brooders or infra-red heat lamps. Providing adequate feed, water and floor space is critical at all stages of production. Overcrowding and insufficient feed and water will result in higher mortality due to starve-outs, dehydration and cannibalism. Table 1 gives recommended space requirements.
| Table 1. Suggested minimum space requirements* | |||
| 1-10 days | 11 days - 6 weeks | 6-14 weeks | |
|---|---|---|---|
| Floor space (birds per square foot) | 4 | 3 | 2 |
| Feeder space (inches per bird) | 0.6 | 0.6 | 1.0 |
| Waterer space (inches per bird) | 0.15 | 0.25 | 0.30 |
| * Facilities, equipment and management will affect space requirements | |||
Brooding Schedule
Two weeks before hatch
Thoroughly clean, disinfect and dry the entire brooding area and all equipment. This includes walls, ceilings, floors and wire. An approved disinfectant should be used after a thorough cleaning. Follow label directions for use of each disinfectant.
If using floor pens, put clean, dry, absorbent litter to a depth of at least two inches in each pen. Litter materials such as wood shavings, pine straw, peanut hulls, sugar cane bagasse or crushed corn cobs are satisfactory. Wood shavings are the best, although hardwood shavings contain materials toxic to young chicks.
Materials containing many sharp splinters should be avoided. Sawdust should not be used; it will support mould growth. Chicks will eat both sawdust and sand, resulting in mortality due to starve-outs.
Wet litter promotes disease and creates ammonia, which leads to poor air quality and respiratory tract irritation.
Two days before hatch
- Turn on the brooders. Infra-red heat lamps or radiant brooders should be adjusted to about 24 to 30 inches above the floor with sufficient room under the lights for all chicks in that ring. Check the brooders repeatedly until all are operating at the proper temperature, 95°F to 100°F at the edge of the hover or heated area and one inch above the floor (the height of the chicks).
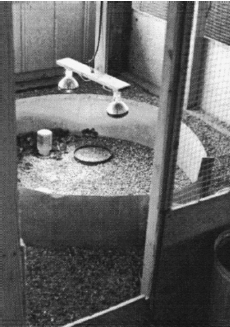
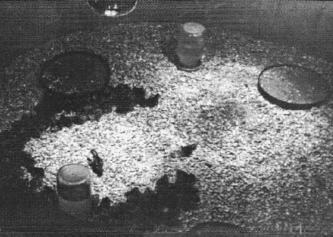
- Set up a brooder ring to reduce draughts and keep the chicks from piling or wandering too far from the heat, feed and water (Figure 5). An 18-inch-high circle of wood, corrugated cardboard or metal placed in a circle around the brooder is commonly used. The circle should be large enough (six to seven feet in diameter) to allow the chicks to escape from the heat of the brooder if necessary. A circular brooder guard will help prevent piling by eliminating corners.
- Check to ensure the litter is free of pests such as fire ants.
One day before hatch
- Fill the feeders and waterers and space them evenly around the brooder. A minimum of three small feeders and three fount-type waterers should be used in each brooder ring. Water fountains for starting chicks should be very shallow; it is preferable to use quart jars with bases made specifically for quail. If using chicken fountains, place marbles or gravel in the bottom to prevent the chicks from getting into the water and drowning. Older quail can use water fountains designed for chickens. The water should be allowed to reach room temperature before the chicks drink it. Waterers should be far enough from the brooders to prevent overheating of the water.
- To encourage the chicks to eat, additional starter feed should be placed on rough paper, feeder lids, or new quail egg flats (Figure 6). Do not use smooth paper or any slick material that will cause the chicks to slip, resulting in spraddle legs. Cylindrical, hanging-type feeders, manual or automatic, can be used after the chicks are a week old.
- Re-check brooder temperature.
Hatch days
- After allowing the chicks to completely dry off in the hatcher, they should be counted and moved to the brooding area. Any weak or deformed chicks should be culled.
- Beak trim the birds before placing them in the brooder area (see Cannibalism section).
- Check the brooder temperature again.
First week
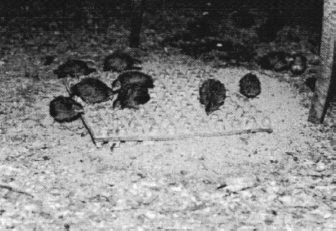
- Check several times daily for mortality, signs of disease or stress, improper brooder operation and other problems. The brooder temperature should be maintained at 100°F. Observe the chicks for signs of comfort. If they pile up directly under the brooder, the temperature is too low; chicks spreading out away from the brooder against the brooder ring means the temperature is too high. The chicks are comfortable if they are evenly spread out around the edge of the brooder (Figure 7).
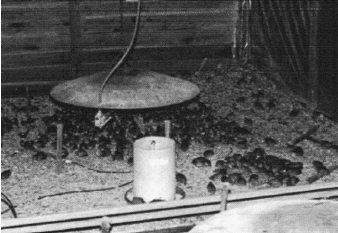
- The brooder guard should be removed after about five days during mild weather or eight days during cold weather (Figure 8). The chicks are usually able to fly over the ring after nine days.
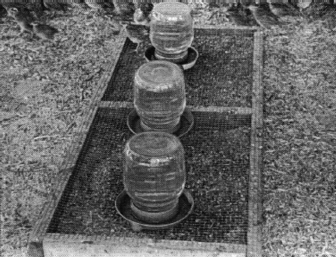
- Clean and refill the feeders and waterers daily, or more often if needed. Gradually replace feeders and waterers with larger ones, beginning on the 5th or 6th day. Place some of the feeders and waterers on raised (two to three inches) wire-covered platforms at the end of the first week; have all on platforms by the end of the 2nd week (Figure 9).
- Promptly remove any dead chicks.
- Water-soluble vitamins added to the water during the first week of brooding may be helpful in getting the chicks started.
Second week
- Reduce the brooder temperature to 95°F.
- Continue to gradually remove the small feeders and waterers; never allow them to stay in the brooder area if they are empty. Cylindrical, hanging-type feeders, manual or automatic, can be used after the chicks are a week old. If hanging feeders are used, the top of the feeder pan should be at the same height as the bird's back.
- Clean the feeders and waterers at least once a day.
Third, fourth and fifth weeks
Reduce the brooder temperature by 5°F per week until the outside temperature or 70°F is reached. Continue to clean and refill the feeders and waterers daily. Provide as much ventilation as possible while still maintaining proper temperature and without causing draughts.
Sixth week
Transfer the chicks to grow-out pens. Cull and trim beaks (if necessary). Change from starter feed to grower feed.
Grow-out
After a brooding period of five to six weeks, the quail should be moved to the grow-out facility. Quail can be grown on the ground or on raised wire floors. If grown on ground or litter, wire boxes should be used under feeders and waterers. This will keep the feeders and waterers cleaner and allow the concentration of droppings to be under wire.
Wire floors for permanent pens should be made in sections that allow for easy clean out of droppings and for cleaning of the wire floor. The floor should be four to six inches from the ground and the supports should be as narrow as possible to prevent a buildup of droppings. The height of the top of the pens should be governed by convenience. The birds are usually provided with a fully wire-enclosed outside pen (Figure 10). However, birds grown for meat purposes should, in most cases, be grown in open-sided, wire enclosed, roofed houses with litter floors.
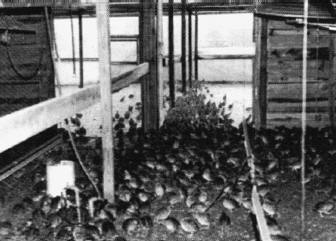
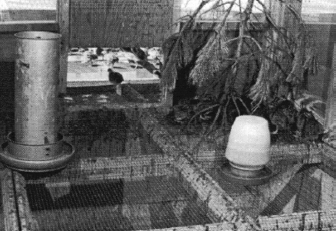
Adequate feeders and waterers must be provided in all areas of the pen and should be cleaned and filled daily. Provide as much ventilation as possible while still maintaining proper temperature and avoiding draughts. Hiding places of pine tree tops or corn stalks in shocks should be provided in all areas of the pen (Figure 11). Do not crowd the birds. Check them daily for signs of disease or cannibalism.
Much of the adult plumage is present when the chicks reach 10 weeks of age; the sex of most birds can be determined by feather patterns at 12 weeks of age; and they are generally considered mature at 16 weeks of age. At this age, the bobwhite can be used for meat or hunting preserve purposes. Breeders can also be paired at this time.
One of the most important considerations during the grow-out period is the proper placement of the grow-out pens. They should be in a secluded location away from people, children, pets and traffic. Birds that have become accustomed to people and noise do not respond well to an approaching hunter in the field.
Flight Conditioning
Hunting preserves want a strong, aggressive, fast-flying bird. To get this type of bird, you must condition the bobwhite quail. Allow the bird to preen and condition itself as it would naturally in the wild. Birds for release need to have good feathering, for looks as well as for flying capability.
Flight pens are generally 12 to 15 feet wide and from 30 to 150 feet long (Figure 12). They are outdoor wire pens with an enclosed shelter at one end and a catching pen (approximately 12×12 feet) at the other end of the run. The pen height should allow tractors to enter the pen and plow the soil. To prevent birds from flying into the wire sides, tops and ends of pens, open-weave burlap or cheesecloth may be fastened to the wire. The material should have an open weave to allow light and ventilation to penetrate. An effective disease prevention program will require enough flight areas to allow for rotation between groups of birds.
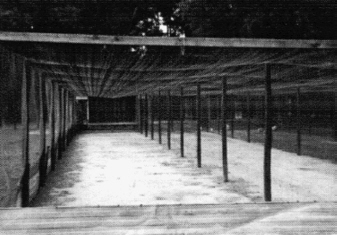
Some producers prefer flight conditioning pens that are no longer than 30 feet, are totally covered, and contain regular litter floors. The theory for the short pen is that the birds do not have room to "cheat" on flight exercise by gliding long distances but must continuously flap their wings. This system does have some advantages in disease prevention because the birds are off of the ground on litter and are protected from the weather. All flight pens should be isolated from people and other animals.
If the flight pens have dirt floors, they should be on well-drained soil with plenty of cover, feed, and water throughout the area. One good practice is to plant a crop in the pen for food and cover, making sure it does not block out sunlight. Shaded, moist ground invites a build-up of moulds, parasites and other disease-causing organisms. When the pens are not in use, they should be deeply plowed, allowing the sun to disinfect the soil.
If wire floor runs or concrete runs are used, provide dust boxes with clean sand for dusting. This will help produce a better looking, well-preened bird that can take adverse weather conditions. If birds are not exposed to rain or dew, they should be misted with water at least once a day to stimulate preening. This can be done with a hose and nozzle but most larger operations install a fogging system. Feed stations should be constructed to prevent feed from getting wet or damp from rain or spray. The use of wire stands under feeders and waterers is advisable.
The birds should have at least two square feet of space per bird in the flight pen. One square foot of space per bird is an absolute minimum. If flight pens are overcrowded, the birds will be bob-tailed as a result of pecking and pulling the feathers from one another. The birds should be put in the flight pen for at least six weeks before release.
December 2014


