

Brooding and Rearing Baby Chicks
Dr James Hermes of Oregon State University Extension Service gives a practical guide to brooding and rearing all types of poultry chicks to small-scale producers and hobby farmers in this Pacific Northwest Extension Publication from 1996.Baby chicks are really quite easy to raise. With a few pieces of equipment and a small place to put them, success in brooding and rearing is virtually assured. During this period of the bird's life, the most important needs are for warmth, protection, feed, and water. When growing chicks of any species-chickens, turkeys, pheasants, or almost any other production bird-each of these aspects must be considered.
Natural vs. artificial brooding
In nature, chicks hatch after 2 to 4 weeks of incubation by the parents, most often the hen. The hatched chicks provide the stimulus to the hen to change her work from incubating eggs to brooding young. This form of brooding chicks is the easiest if only a few chicks are raised because the mother hen does all the work.
Hens that are "good mothers" include Rhode Island Red, New Hampshire, Plymouth Rock, Cochins, and Silkies. Under natural brooding, chicks can easily be fostered under a broody hen at night, and she will raise them as her own even if they are pheasants, turkeys, quail, or waterfowl.
When broody hens are not available, or large numbers of chicks are to be raised, artificial brooding is necessary. Chicks will perform equally well under artificial or natural brooding, providing they are precocial; that is, able to walk and feed themselves within hours of hatching, as baby chickens are.
Novice growers are not advised to try artificial brooding for altricial chicks; that is, chicks such as pigeons, doves, finches, and parrots that remain in the nest to be cared for and fed by the parents. Many of these chicks are naked, blind, and unable to walk for several weeks after hatching and require around-the-clock care and feeding.
Housing
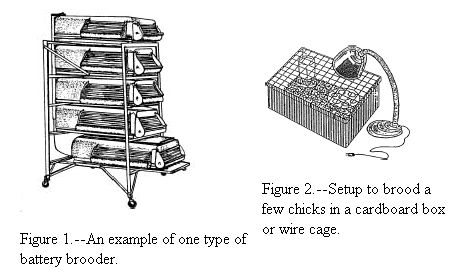
Chick brooders can be elaborate pieces of equipment such as tiered battery brooders (Figure 1) or as simple as a cardboard box (Figure 2) in the house or garage. In both cases, the most important aspect is to maintain conditions that allow the birds to thrive.
Battery brooding
Because birds in battery brooders are kept in multiple layers, many chicks can be brooded in a relatively small amount of floor space. There are many designs. Most include an electric heat source at one end, usually in an area that is somewhat enclosed; another area, about two to three times the size of the heated area, is not heated.
The walls and floor of each brooding area most often are wire. A droppings pan under the wire floor requires regular cleaning. In many cases, feed and water are provided outside the brooding space, making management easier.
Battery brooders are an excellent way to brood chicks in a small space. However, chicks can remain in these brooders only a few weeks before they outgrow them. In addition, the cost to purchase one of these units is high.
Floor brooding
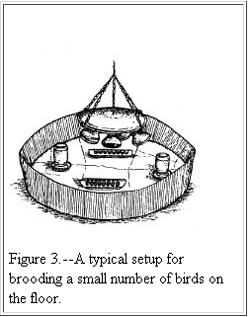
Most growers will choose to brood chicks on the floor (Figure 3). Material requirements are minimal, but the environment is comparable to battery brooding.
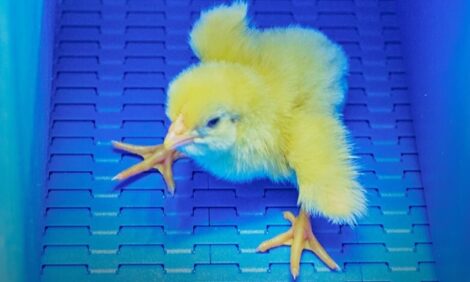
Flooring. Some type of bedding material or litter is required. Litter must be absorbent and must insulate the chicks from the ground. Most important, litter must not be slippery. A slippery floor, such as newspaper, cardboard, or a glass-bottom aquarium, is disastrous for baby chicks. Many chicks will develop "spraddles," a condition in which their hip joints become dislocated, which is nearly always fatal.
Ideal litter is sawdust or wood shavings; straw can be used if it is chopped into short lengths and is not moldy. Litter must be changed or top dressed (clean litter added over the dirty) if it becomes wet, and that must be done more often as the birds age.
Draft shield. A draft shield is cardboard or wire that surrounds the brooding area (Figure 3). The sides of a box used for brooding act as a draft shield. The draft shield provides two important functions. As its name implies, it reduces the possibility that drafts will reach the birds. It also keeps the birds close to feed, water, and heat. In some cases, young chicks become "lost" and succumb to the elements if brooded in too large an area. Draft shields can be removed after about 1 to 2 weeks, unless conditions are extremely cold or drafty.
Heat. For small numbers of birds, heat usually is provided by heat lamps or light bulbs. When large numbers (200 or more) are brooded together, it may be more economical to use propane hovers. Many types of hovers are available if desired.
Proper temperature must be maintained if the chicks are to thrive. During the first few weeks, chicks are cold blooded; that is, unable to maintain their body temperature. As they age, they become warm blooded; that is, able to maintain constant body temperature under normal environmental conditions.
Two methods of monitoring chicks' environmental temperature are used successfully. First, start chicks at about 95°F (measured near the heat source at chick height), dropping the temperature about 5°F each week until the birds are feathered or ambient temperature is reached.
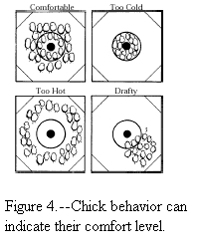
The second method relies on observing the chicks (Figure 4). If the chicks are all under the heat source, it is too cold; if they are all far away from the heat, it's too hot; if they are clumped away from the heat, it is drafty; if they are milling about in all areas of the pen, the temperature is correct.
Note: When brooding in a small area, take care that both warm and cool areas are available to the chicks so they can move from warm to cool and back again at will. Otherwise, chicks can get chilled or over-heated when only cool or warm conditions are available.
Space requirements
Floor space
Baby chicks are small when they hatch but grow quite rapidly. Broiler chicks reach 5 pounds in little more than 6 weeks. Therefore, chicks need space to grow. Space usually is not limiting in most small-flock situations; in fact, most chickens reared in small flocks have plenty of space.
Minimum space requirements are as follows:
- For broilers, 0.75 to 1 square foot per bird
- For Leghorns and bantams, 1.5 to 2 square feet per bird
- For heavy breeds, 2.5 to 3 square feet per bird
- For turkeys, 3 to 4 square feet per bird
- For game birds, double or triple the requirements for turkeys
Feeder and waterer space
Feeder space requirements vary with feeder type and the age of the birds. The rule of thumb is that all the birds should be able to eat or drink at the same time. Therefore, when using trough feeders or waterers, allow 1.5 to 4 inches per bird. When using circular feeders or waterers, allow about 1 to 2.75 inches per bird.
Lighting
Light is a powerful stimulus for most production birds. The small producer should consider both light intensity and photo-period (day length).
Light intensity is the brightness of the light as measured in footcandles (the amount of light a candle emits at a distance of 1 foot). Most chicks can be started at about 2 footcandles and reduced to 0.5 to 1 foot-candle at after 1 week. An easy rule is that if you can read a newspaper, there is enough light. If light in the brooder is too bright, the chicks may begin feather picking.
Photoperiod is the number of hours of light in a 24-hour period. Ideally, chicks that will be kept for laying should be raised under 24 hours of light for about the first week. Then, light should be dropped to about 16 hours a day until about 10 weeks of age.
Between 10 and 20 weeks, chicks should be placed either on short days (less than 12 hours of light a day) or a decreasing day length. In the latter case, reduce day length by 15 minutes each week.
Under natural light, spring-hatched chicks reach maturity under decreasing day lengths. The reverse is true of chicks hatched in the late summer and fall.
If chicks are given long or increasing day lengths too early, they will begin laying early and may have poor production their entire lives.
Broiler chicks should be raised in 24-hour light for maximum growth rate. Various lighting schedules can reduce energy usage while maintaining the birds' growth rates. However, these schedules may be complicated, and they must be strictly followed or their effectiveness is greatly reduced.
Feeding
Chicks require a balanced diet if they are to grow and thrive. When starting chicks, always feed a starter diet that is formulated to give the birds the proper levels of nutrients. They should be fed free choice; that is, feed is available all the time. Supplement only minimally with other feeds.
Baby chicks do not need scratch. Heavy supplements of scratch, table scraps, or greens will reduce chicks' nutrient intake and may result in poor growth or, worse, increased mortality.
After about 6 weeks of age, they can be fed a grower diet; generally this diet is lower in protein because the chicks are growing more slowly. Do not feed adult diets to baby chicks, especially layer diets. These feeds are very high in calcium for egg shell formation and are not suitable for baby chicks.
Water must be provided constantly. It should be room temperature, clean, and fresh. Supplemental vitamins added to the water are not necessary if the chicks are fed properly. When brooding, make sure the water does not become too hot from the heat source because many birds will refuse to drink warm water.
Sanitation and disease
For the most part, chicks are quite hearty. For maximum survival rate and to minimize disease problems, buy chicks from a reputable source. Most commercial hatcheries vaccinate their chicks for Marek's disease at hatch, so this should not be a problem. Most starter feeds contain a coccidiostat to reduce the potential for coccidiosis in the flock. (Nonmedicated feeds are available.) Antibiotics are available at local feed stores but should be used only when absolutely necessary and then only according to the label instructions.
If birds get sick, get a proper diagnosis from your local avian veterinarian or your state avian pathologist. Call your county office of the OSU Extension Service for help in finding these veterinarians.
Sanitation is your best defense against disease problems. Keep your facility clean, feed only fresh, nonmoldy feed, clean waterers daily, and keep your flock relatively isolated from other birds. Bird and human traffic in and out of your facilities is the single most important means of bringing disease organisms to your birds.
Minor
management needs
Sexing
Determining sex in chickens usually is easy. By about 4 to 6 weeks, males begin to show comb, waddle, and spur development, and they begin to grow larger than the females. Some species of game birds and waterfowl require "vent sexing," a somewhat difficult procedure to examine their genitalia, to separate the sexes.
Flight prevention
Most chickens don't fly well, so flight prevention usually is not necessary. However, most game birds and waterfowl may require grounding. The easiest method is to clip the flight feathers of one wing; those are the 10 or 15 large feathers on the end. Repeat the process regularly as feathers grow back after molting. Don't clip feathers on exhibition chickens because that may disqualify or downgrade the birds.
Brailing uses a strap to prevent the bird from fully extending its wing for flying. The brail strap should be moved to the opposite wing at least monthly so as not to cause wing atrophy. Pinioning and tendonectimizing are permanent methods of flight prevention. They should be attempted only by experienced growers or a veterinarian.
Picking
In confinement, many birds may begin to pick on each other, causing poor feathering or areas of the body without feathers.
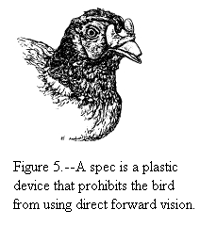
Various salves are available to reduce picking. Trimming about a quarter of the upper beak with a toenail or dog-nail clipper will greatly reduce picking. For serious cases, applying a plastic device called a spec, which prevents forward vision, is quite effective (Figure 5). For maximum effectiveness, trim beaks or apply specs on all the birds, not just on the aggressors.
July 2009


