

Hatching Ostrich Chicks
By Joe Berry, Extension Poultry Specialist, Oklahoma Cooperative Extension Service - Production of the ostrich in the US in locations other than zoos and wildlife preserves is a relatively new segment of animal husbandry. The natural home of the ostrich is Africa, but large numbers of the birds are now being produced in the US and Canada. Birds are being sold to be used as breeders and for slaughter purposes. Growers hope to continue to expand the slaughter market as well as the market for hides and feathers.Egg Production
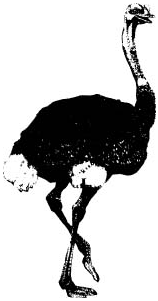
 Egg production usually begins when the female is sexually mature (at about two years of age) and if she is mating with a male. Eggs are generally produced about five to ten days after the first mating. During the mating season the plumage of the male gets much brighter. Also, males display more color in the legs than do the females. Part of the courtship process is a booming sound the male makes, and the thumping or drumming sound he makes by sitting down and hitting his head on alternating sides of the back. The hen sits down and flutters her wings. After mating, the male usually scratches out a crude nest in the dirt and the female will deposit the eggs in the nest. The number of eggs varies widely with 15 to 20 being considered normal; however, some producers in the U.S. have reported production of 75 to 100 eggs during one laying season. Eggs usually weigh about 2 1/2 to 3 pounds (1,135 to 1,362 grams) each.
 Eggs should be collected soon after they are produced to avoid breakage. Storage of eggs should be at 55 to 60 degrees Fahrenheit for no more than seven days. All eggs produced during that seven day period can be incubated at the same time. If eggs are incubated as they are produced, hatching will be more frequent and will require more management time. Holding the eggs for seven days should not lower the hatching percentage if the eggs are stored properly. Eggs should be turned daily prior to incubation to maintain maximum hatchability. Eggs that need to be cleaned should be carefully sanded to remove any adhering dirt or foreign material. In the case of extremely dirty eggs, washing can be done as long as the clean water is at least ten degrees warmer than the eggs (do not use hot water).
Incubation
The incubator should be tested at least 12 hours prior to use. This allows adjustments to be made and the temperature regulated prior to starting the incubation process. The incubator should also be cleaned and properly disinfected prior to use. Disinfecting the incubator should include a thorough cleaning to remove any organic material, followed by a thorough application of a disinfectant. The incubator can then be fumigated (not always recommended due to dangerous gases produced) or exposed to ultraviolet light for several hours. The final step is to let the incubator dry before placing it in use. The temperature for incubation of ostrich eggs is 97.6 degrees Fahrenheit. For eggs that are extremely large (1,800 gm. or more), it may be advisable to use an incubation temperature of 97.5 degrees Fahrenheit. By using the lower temperature the length of the incubation period will be increased by a few hours and the eggs will have more time to lose moisture. The temperature is critical for a good hatch, so only small adjustments should be attempted.
 The humidity in the incubator is also important. Relative humidity in the range of 25% is about correct for proper hatching of chicks. The actual relative humidity will need to be determined by each individual and may vary will different egg sizes. The incubator room will likely need to be air conditioned and a room dehumidifier may also be needed in order to get the relative humidity low enough in the incubator. If the humidity level in the incubator is too high the result will be chicks that are wet and puffy. These birds usually do not get off to a good start and the mortality rate is usually quite high. Some producers feel that eggs should lose approximately 15% of the original weight during incubation. Adjustments in the humidity may be required in order to encourage weight loss in the eggs during incubation. Careful weighing of the eggs and keeping accurate records are vital to successful hatching of ostrich chicks.
During incubation eggs should be positioned with the large end up, and if possible, at a 45 degree angle. Positioning the eggs on the side is also acceptable. The eggs should be turned at least twice daily (8 to 10 times per days is better) until the thirty-ninth day when the eggs are transferred to the hatcher. If turning is by hand the eggs should be marked (perhaps with an X and an 0) to insure that each egg is turned. The eggs can be candled to determine fertility after two weeks. Once identified, infertile eggs should be removed from the incubator. At the time the egg hatches the chick will first pip into the air cell, then pip through the outer shell. After piping, the chick will slowly turn inside the egg, breaking the shell as it turns. After the shell is cracked or broken almost all the way around, the chick can push its way out of the egg. If progress is delayed it may be necessary to crack the shell to give the chick a little help. (Progress can be monitored using the candling light.) It is not recommended that the chick be helped out of the shell unless the incubation period is well beyond the forty-second day. If the chick is rushed, the navel may not have properly closed. An infected navel frequently leads to a dead chick.
Before a chick leaves the hatcher, the navel should be checked to see that it is properly closed and then should be treated with a 7% iodine solution to guard against infection. A second treatment two or three days later may be necessary. After the first week the navel should be checked again. If a dried umbilical attachment is still present (looking like a large coarse hair) it should be pulled from the navel and the area treated with iodine a third time. If this procedure is not followed, the risk of navel and yolk sac infections may be increased.
Feeding
 Feeding the newly hatched chicks properly is important to a healthy start in life. Chicks should not be fed for three to five days in order for them to lose some of the edema that may be present and to encourage the body to utilize the yolk sac that is drawn into the body just before hatching. The yolk sac is nature's way of providing for early nutritional needs and also some passive immunity that may help the chicks successfully survive challenges from diseases later in life.
When feed is offered to the chicks it should be a commercial ration formulated for the specific needs of the chicks, or a custom mixed ration that has also been specifically formulated for the chicks. The addition of other items to the diet is probably not necessary and will only increase feeding costs of the chicks. One possible exception is the feeding of chopped fresh alfalfa. Ostrich chicks seem to like fresh alfalfa and it should not be detrimental unless available in large quantities. Large amounts may encourage the chicks to overeat and become impacted.
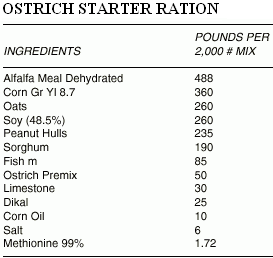
When selecting a ration for ostrich chicks it is suggested that a low protein (less than 20%) and a high fiber (more than 15%) feed be used. A ration of this type should meet the chicks needs but not result in a growth rate rapid enough to cause leg problems due to extra weight. A ration that is suggested as a possible chick diet is shown at the end of this publication.
Brooding
The brooding period is a critical time for chicks. It can be a time of high mortality if proper management is not used. The brooding area should always be clean, sanitary, and have protection from the weather. A source of heat should be provided for the chicks. The heat source should be one that the birds can get close to if too cold and get away from if too warm. Heated floors in the brooding area are not recommended. Producers who have used heated floors have experienced more leg problems than those using overhead heat. Chicks are frequently kept in brooder boxes for the first few days after being removed from the hatcher. These boxes or the brooder area should have some type of floor covering that is not slippery. A slick floor can cause the chicks to slip and result in leg damage.
As soon as possible the chicks should be moved outside to larger pens where they can get more exercise. The length of time between hatching and moving the chicks outside will be partially determined by the weather, but chicks need to be in larger pens as soon as possible. They should be encouraged to run or walk to strengthen muscles. Some producers place a ball in the pen as a toy for the chicks. When chicks are placed outside their activities should be closely monitored to prevent them from eating too much of items that could cause digestive system impactions. At first the chicks may need to be outside for only short periods of time and then moved back inside. The length of time outside can be extended as birds get older and if weather permits. Confinement inside at night is a good idea until the birds are several weeks of age.
Summary
In summary, there are at least three topics that should get extra attention in the hatching program: chick hatching, egg and chick sanitation, and chick management and nutrition. By giving careful attention to detail and by putting into practice the best known management techniques there should be a reward in terms of increased chick numbers and better livability.
Source: Oklahoma State University - Cooperative Extension Service - April 1996


