


Loading egg incubators for optimal heat balance (Part 2)
This series of 3 articles shows you the best possible ways to mix eggs from different flocks in the incubator. Now you understand the basic principles of heat production and exchange, we will explain how to correctly load the setter. 31 October 2018
 6 minute read
By Eduardo Romanini, Hatchery Development Specialist, Petersime
Part 2: Positioning the eggs in the setter
At this point, you probably wonder how you should position the eggs to get the most even temperature distribution in the incubator? The key is to apply what we have learned about the heat exchange in the incubator and the heat production in the incubated eggs.
See the incubator as a mirror symmetry
Let’s take a typical Petersime BioStreamer™ setter with 12 trolleys as an example. The trolleys are evenly distributed on both sides of the central mixing fan: 6 trolleys on each side, of which 3 trolleys in the front and 3 in the back.

A BioStreamer™ setter with 12 trolleys
First off, you should realise that airflow is the same on the left and right side of the central mixing fan. This means that cooling, heating and ventilation are mirrored in the incubator. Each condition happening on the left side, will occur identically mirrored on the right side. At least, that’s how it should be.
Eggs on a certain position on the left side will experience the same conditions as the mirrored positioned eggs on the right side of the incubator. But, this is only possible if they have the same characteristics and if they are equally distributed. If on one side eggs are missing or one trolley is missing, this will disturb the airflow pattern and cause adverse effects. That’s why balancing the eggs correctly between left and right is key.
We all know that huge incubator capacities make it difficult to have the same eggs in all 12 trolleys. No doubt about it. But let’s agree, for the success of our incubation results, to always have at least two trolleys with the same egg characteristics (flock age, egg storage, fertility…). By distributing them in a mirrored position, left and right will be in balance. And so will heat production and heat dissipation.
Pay attention to the eggs on control
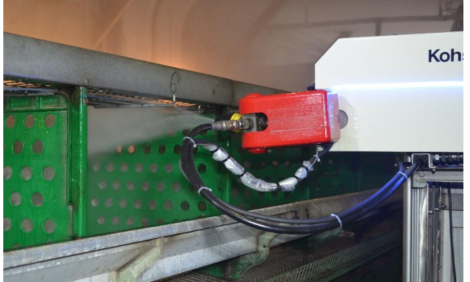
In any case, it’s important to remember that the three OvoScan™ devices are always installed on a fixed position: on the setter trolleys next to the left wall of the incubator. The eggs surrounding the OvoScan™sensors are responsible to provide continuous information to the machine controller. This means that the temperature measurements of these sampled eggs will be used to automatically adjust the air temperature in the setter for all the eggs throughout the entire incubation time.
That’s why a careful selection of these eggs is crucial. Are they a good representation of the population? Are they uniform in size and colour? Sampling the right eggs for eggshell monitoring is critical for the process.
It makes sense to put eggs with medium heat production in the trolleys with the OvoScan™. In other words, a group of eggs with intermediate “living mass” compared to the remaining incubated eggs. This could be eggs with middle fertility, from a middle-aged flock and/or with a middle storage time.
Mind the spiral airflow effect
Now we know that eggs with average heat production belong on the trolleys near the wall. What about the trolleys positioned centrally on each side of the incubator?
Just think about the effect of the spiral airflow distribution: the eggs on the trolleys in the middle experience a relatively lower air speed with slightly less efficient convection. Fact is that it is more difficult in this position to transfer heat in or out of the eggs. Do you see where we’re going with this?
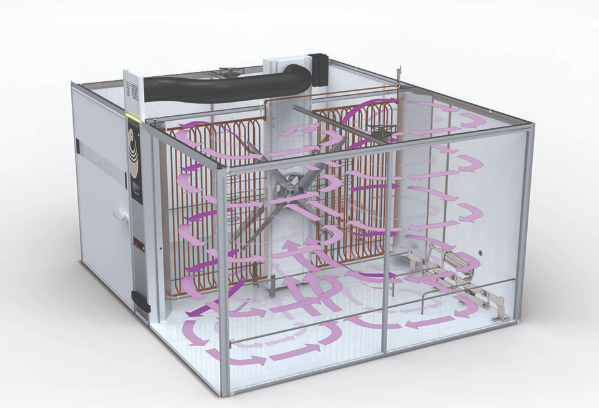
Spiral airflow distribution in a Petersime incubator
Right. The central trolleys on each side of the incubator are the best positions for eggs with a lower “living mass”, thus a lower heat production. For example: the eggs with the lowest fertility, the youngest flocks (smaller eggs) and/or the eggs with a prolonged storage time. The central position in between trolleys allows these eggs to get indirectly additional heating from the surrounding eggs.
At this point it’s clear that eggs with potentially higher heat production (higher “living mass”) belong on the trolleys next to the central mixing fan of the incubator. Eggs on these trolleys experience slightly higher air speed which facilitates the heat transfer. The perfect position for the grouped eggs with the highest fertility rates (or expected hatchability), the oldest flock (large eggs) and/or eggs that have been stored for a short time.
Following these guidelines will surely result in the best possible heat balance distribution of the eggs in the machine. Or if you want an even better outcome, just load the machine with as much homogeneous eggs as possible in all trolleys.
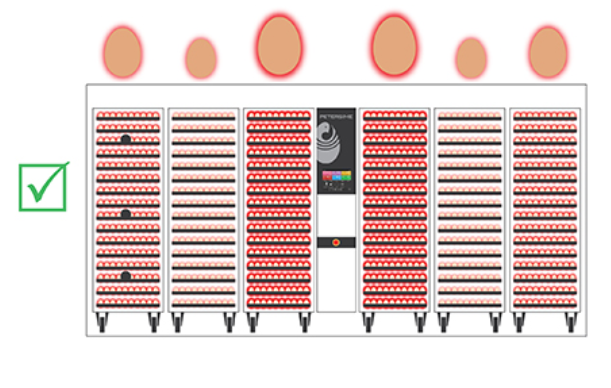
Correct loading pattern for setters according to differences in egg heat production
But what if you don’t?
What if you do it differently and place the eggs with relatively higher or lower heat production in the OvoScan™ trolleys near the wall?
Here’s what happens: the OvoScan™ takes these eggs as a reference for the complete incubator. Depending on the “living mass”, the incubator will heat or cool down the air temperature until the measured eggshell temperatures next to the OvoScan™sensors are adjusted. As a result, the eggs on the other trolleys will be affected too.
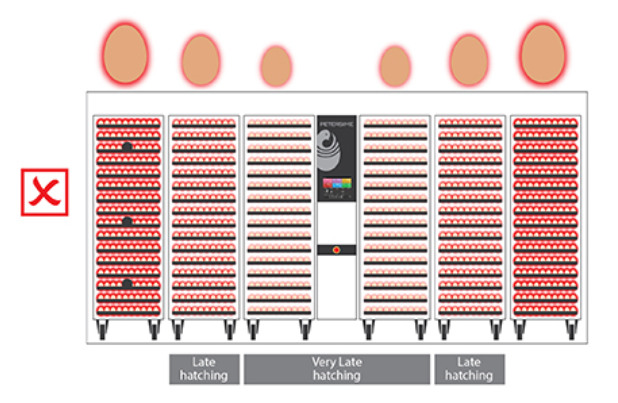
Incorrect loading pattern: eggs with higher heat production on the OvoScan™ trolleys
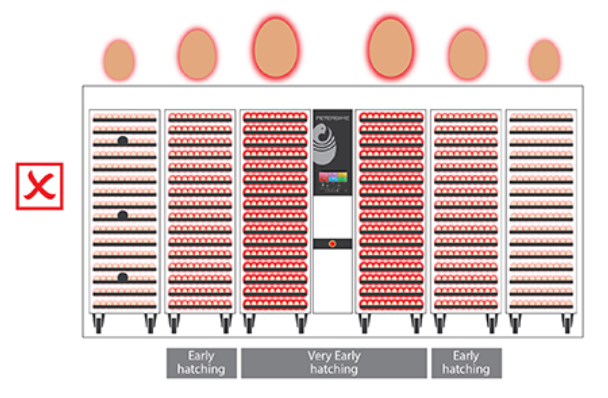
Incorrect loading pattern: eggs with lower heat production on the OvoScan™ trolleys
Sadly, in this case a reduced temperature will slow down the embryo development for these eggs and the incubation time will become longer. Or in the opposite situation, some eggs tend to become overheated and therefore accelerate embryo development and hatching.
Basically, any other loading pattern configuration that does not follow the ideal combination between egg heat production and micro-environment in the incubator will produce a wider hatch window with early and late hatches within the same machine. Chick uniformity becomes a big issue then.
Now it’s up to you
The guidelines above are a good way to get started with loading eggs from different flocks into big capacity setters. When we respect the thermal balance between left and right, the egg heat production and the incubator ventilation, we create a more homogenous heat distribution in the machine.
Still not sure about how to do it? For daily assistance in applying the correct loading procedure for every individual flock and for different setter sizes and configurations, Petersime offers the ‘Loading pattern generator’. This tool is part of the Operational Excellence™ software for members of the Operational Excellence™ Programme and provides you with the best positioning of your eggs for optimal heat balanced loading.
Now the next question is: what’s the best transfer and loading pattern for your hatchers? That’s another story that we’ll tell in the next article of this series!