


Investigating Hatchery Practice - Examining the Hatch Debris
In the fourth article of this series, Dr Steve Tullett, consultant for Aviagen specialising in incubation and fertility, discusses the reasons for examining the hatch debris. The article forms part of a recently published Ross Tech publication, Investigating Hatchery Practice. 9 January 2010
 9 minute read
Recognising Developmental Stages and Malformations
Before collecting the hatch debris, it is good practice to count and then weigh in bulk the Grade-A chicks from the tray in order to calculate an average chick weight and the chick yield (ratio of the average chick weight to the average fresh egg weight or egg weight at setting). The reasons for this are described more fully in a previous section of this publication [click here].
The number of dead chicks on the tray and the number of cull chicks should also be recorded. The unhatched eggs should then be collected onto egg trays for internal examination. For hatchery troubleshooting, debris from around 1,000 eggs set should be collected, taking samples in a structured way from throughout the setter. It is important to know whether or not the sample trays have had clear eggs removed, and if the spaces created were back-filled.
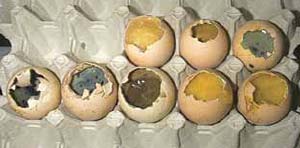
In the past, we have probably relied too much on the analysis of the hatch debris, but the deterioration in some eggs, along with the complicating factor of contamination (Figure 15), can make the accurate differentiation of infertiles and early dead embryos difficult. However, if candling is performed early in incubation (see previous sections of the publication), it is much easier to correctly place eggs into the infertile and early dead categories.
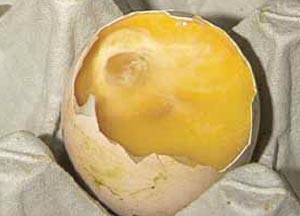
Examination of the hatch debris is really only for the accurate diagnosis of embryo deaths from the 'Blood Ring' stage onwards. A detailed list of diagnostic features for each stage is given in Tables 1 and 2 in a future section of this publication. Decomposition after death means that in the hatch debris there is often no blood visible in eggs that died at the 'Blood Ring' stage. A clear area in the centre of the egg caused by the fluid-filled amniotic sac may be the only evidence after 21 days of incubation (Figure 16).
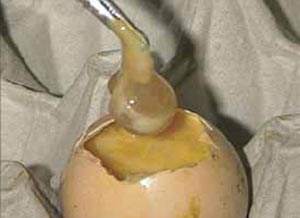
The amniotic sac can be lifted out with forceps and the remains of the embryo may be found within it (Figure 17).
Embryos at the 'Feathers' stage are easily identified in the hatch debris (Figure 18).
If in doubt, it is better not to try to distinguish between infertile and early dead embryos in the hatch debris, but to note if the infertiles plus early deads exceed target. More accurate examination may then be made of fresh unincubated, or partially incubated eggs or incubator 'clears'.
When examining hatch debris any malformations of the embryo should also be recorded (e.g. exposed brain, extra limbs, exposed intestines) and the position of embryos that were close to hatching should be noted.
| Normal hatching position and the six recognised malpositions (viewed from the top of the egg) |
|
|---|---|
 |
Normal Hatching Position |
 |
Malposition 1 – Head between thighs |
 |
Malposition 2 – Head in small end of egg |
 |
Malposition 3 – Head turned to left |
 |
Malposition 4 – Beak away from air cell |
 |
Malposition 5 – Feet over head |
 |
Malposition 6 – Beak above right wing |
| A combination of malpositions may occur in the same embryo. | |
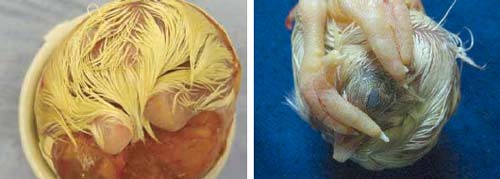
right: Figure 20. 'Feet over head' is a common malposition in which the feet interfere with movement of the head and rotation of the embryo and reduce the likelihood of hatching
Recording Egg Contamination
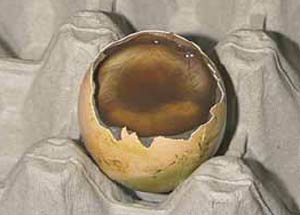
It is a topic of debate whether contamination has always killed the embryo or whether the contamination was held in check until the embryo died. Nevertheless, every egg opened should be assessed for bacterial contamination, e.g. egg contents green, black, emitting rotten odours or egg explodes on opening. However, colour should not be the sole guide as brown coloration can be due to the deoxygenating process.
Heavily contaminated eggs often explode on opening and in others the embryo may be hard to distinguish easily. It is not important to accurately record the time of embryo death in grossly contaminated eggs. The objective is to record the total percentage of contaminated eggs and compare the result with standards from best practice. This will enable you to assess the effectiveness of your egg handling and sanitation procedures. The eggs could be recorded as an 'Early rot' if the embryo died at the 'Black Eye' stage or before, 'Late rot' if it had reached the 'Feathers' stage or simply recorded as 'Contaminated'.
Aspergillus represents a special case of contamination and can be a serious problem in some areas. Whenever eggs are opened through the air cell and mould growth is observed on the inner shell membrane this should be recorded as a potential aspergillus contamination and care should be taken not to breathe in or spread the mould spores.
Further Reading
| - | You can see other articles in this series Investigating Hatchery Practice by clicking here. |
January 2010